- 16th February 2016
Hot Water Bottle Cover

Our house is old and over the years it’s been pulled about, the floors have been taken up and the windows were replaced when a neighbouring house was bombed and now nothing fits.
With the wind in the right direction the curtains can move in the draught let in by the closed windows, there is no double glazing and daylight can be seen around the front door. This house is draughty.
Hot water bottles are essential not just at night but when you’re on the sofa or typing at the computer. And every hot water bottle needs to be clad in its own woolly cover.
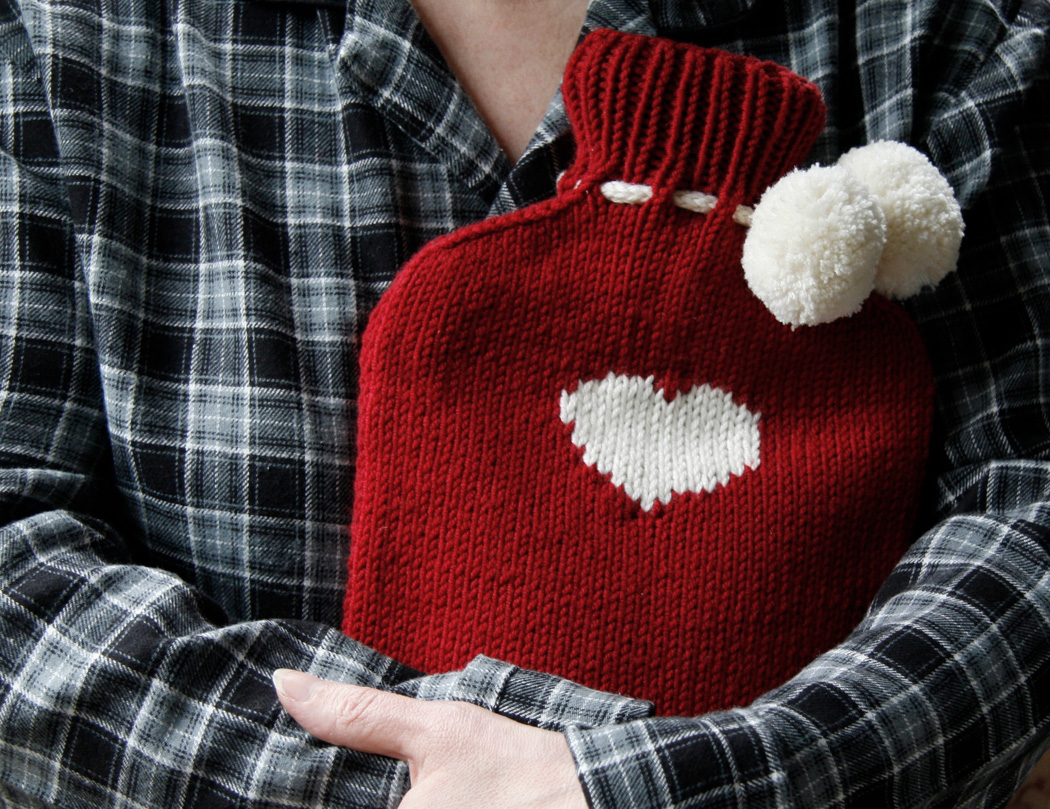
Here’s one with a heart for when romance is dead and all you get is complaints about cold feet.
To fit a 21 cm wide x 28 cm long hot water bottle (excluding neck)
You will need
2 x 50 g balls Debbie Bliss Rialto Aran in main colour
1 x 50 g ball Debbie Bliss Rialto Aran in contrast
1 pair 3.75 mm needles
1 pair 4.5mm needles or size to obtain tension
1 set 4.5 mm double pointed needles
Stitch holders or scrap yarn
Stitch marker
Darning needle
2 or 3 large press studs
Tension
19 sts x 27 rows = 10 cm measured over stocking stitch using the larger needles
Abbreviations
k: knit
k2tog: knit the next 2 stitches together
p: purl
p2tog: purl the next 2 stitches together
Rem: remain(ing)
RS: right side
ssk: slip, slip, knit. Slip the next 2 stitches, knit wise, one at a time, return to left hand needle in their new orientation and knit together through the back of the loops.
St(s): stitch(es)
tbl: through back of loops
MC: main colour
CC: contrast colour
WS: wrong side
yo: yarn over
Back
With 3.75 mm needles cast on 43 sts.
Row 1 (RS): K1, *P1, K1; repeat from * Repeat row for 6 rows in total.
Stocking Stitch
Row 7 (RS): Knit
Row 8: Purl
Repeat until work measures 21 cm ending with RS facing for next row.
Shaping
Row 1 (RS): K2, ssk, knit until 4 sts rem at end of row, k2tog, k2
Row 2 (WS): P2, p2tog, purl until 4 sts rem at end of row, p2tog tbl, p2. Decrease as set on every row until 19 sts remain.
Place sts on a holder or scrap yarn.
Front
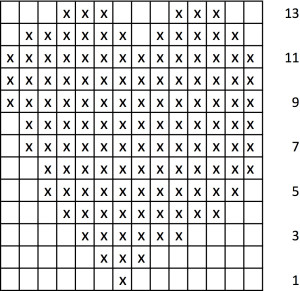
Work as for back until work measures 23 cm. ending with a wrong side row. Working from the chart place the heart motif as follows
Row 1: K 21 sts in MC, k1 st in CC, k 21 sts in MC
RS row: Knit in stocking stitch until work measures 31 cm ending in a WS row.
Shaping
Row 1 (RS): K2, ssk, knit until the last 4 sts, k2tog, k2
Row 2 (WS): P2, p2tog, purl until the last 4 sts, p2tog tbl, p2. Repeat decreasing rows until19 sts remain.
Place sts on a holder or scrap yarn.
Carefully block knitting.
The back should measure 21 cm at its widest and 30.5 cm long.
The front should measure 21 cm at its widest and 41 cm long.
From the neck downwards, seam the sides of the cover using mattress stitch, stopping 3cm from the back ribbing. Do not sew in ends.
Neck
Transfer live front stitches to a double pointed needle and the back stitches to another needle. Divide the work between three needles as follows.
K 12 sts of front on to 1 needle, k rem 6 sts of front and 6 sts of back on to second needle, k rem 12 sts on to a third needle. Join to work in the round.
Row 1: *K2 tog, yo; rep from * the last yo will be between the last stitch of the round and the first st of the next round. Place marker.
Row 2: *K1, p1; repeat until end of round.
Repeat row 2 until ribbing measures 6 cm.
Cast off loosely.
Fold the ribbed end of the front of the cover towards the back so that it is under the ribbing of the back of the cover, to make an envelope. Finish sewing the side seams catching in all three layers. Sew in loose ends.
Sew on press studs.
Icord
Using double pointed needles cast on 3 sts leaving a tail end of 30cm.
Row 1: Knit 1 row. Do not turn work.
Push the stitches to the other end of the needle
Row 2: Taking the yarn around the back of the work knit the row again starting with the first stitch (the one furthest from the working yarn)
Repeat row 2 giving the end a gentle tug occasionally to set the stitches. Knit 26 cm. Thread the long end of yarn on to the darning needle and feed the icord through the eyelets to check that is long enough. If it is cast off but make sure you leave a long tail again.
Make 2 pompoms
Attach the pompoms to the end of the icord but make sure the icord is threaded through the eyelets first!


